Terminology
/General
Resolution vs. Accuracy: Understanding the Key Differences
Explore the fundamental differences between resolution and accuracy in measurements, with clear explanations and examples.
3 min read
Advertisement
Table of Contents
Navigating the world of measurement and instrumentation can sometimes feel like wading through a sea of technical terms. Two terms that often cause confusion are “dead zone” and “dead time.” While they might sound similar, they refer to distinct aspects of an instrument’s behavior. Let’s break down these concepts and highlight their differences.
The dead zone of an instrument refers to the range of input values where the instrument simply doesn’t react. Imagine a thermostat where the temperature needs to change by several degrees before it registers any shift and kicks the heating or cooling system into action. That span of temperature change where nothing happens? That’s the dead zone.
In more technical terms:
The dead zone is the largest change in input quantity for which there is no output from the instrument.
Think of it as a “no man’s land” on the input scale where the instrument remains unresponsive.
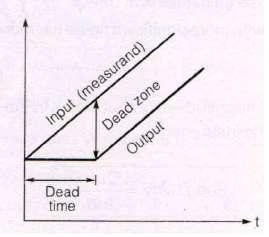
Now let’s shift gears to dead time. Dead time isn’t about input ranges; instead, it’s about the delay in response. When a measurand (the quantity being measured) changes, there is a small but potentially significant delay before the instrument begins to show that change. That pause? That’s the dead time.
In more technical terms:
The dead time is the time required by an instrument to begin to respond to a change in the measurand.
Think of it like hitting the gas pedal in a car - there’s a short delay before the car actually starts accelerating. That’s the principle behind dead time.
Here’s a quick table to highlight the main contrasts:
| Feature | Dead Zone | Dead Time |
|---|---|---|
| What it is | A range of input where no output occurs | A delay before a response begins |
| Focus | Input quantity (range) | Time |
| Analogy | A thermostat that needs to see a significant temperature change before reacting | A delay in a car accelerating after pressing the pedal |
Understanding the difference between dead zone and dead time is important because it directly impacts the accuracy and reliability of measurements.
By being aware of these characteristics in our instruments, we can choose the best tool for a given task and understand potential limitations and inaccuracies. In essence, it helps us make better-informed decisions.
Advertisement
Terminology
/General
Explore the fundamental differences between resolution and accuracy in measurements, with clear explanations and examples.
Terminology
/General
Explore the differences between accuracy and repeatability in measurements. Learn how they relate to each other and why both are essential for reliable results.
Measurements
/General
Explore the difference between static and dynamic measurement errors, their definitions, and how they impact measurement accuracy.